How to Reset an Excel Spreadsheet for Data Entry
You may have Excel spreadsheets that you or others use for data entry purposes. Sometimes, despite our best efforts, entries get saved into a master copy of such spreadsheets. Fortunately you may not need to go cell by cell to erase the entries. To start, I’m going make a distinction between data that you want to remove and text that serves as captions that you want to keep:
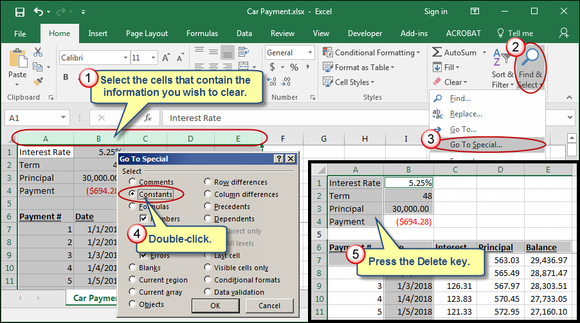
- Select the cells that contain the data you want to remove, which can include formulas as well. Indeed, it’s often formulas that can be the challenge.
- On Excel’s Home menu choose Find & Select, and then Go To Special.
- Double-click on Constants. Double-clicking an option such as Constants allows you to skip the OK button. This step should select only the data cells from within the range you selected but not any formulas.
- Press the Delete key to clear the cells but keep the formatting intact. Alternatively you could choose Clear, and then Clear Contents from the Home menu. Choose Clear All if by chance you want to remove the formatting as well, but typically our goal in situations like this is to strategically remove data entry items.
To summarize, the Constants choice within the Go To Special dialog box allows you to select only cells that contain text or numbers within a given range that you’ve selected within the spreadsheet. This makes it easy to remove unwanted numbers and text from a spreadsheet.

